One woman's foray into cooking for herself, for her family, and for her friends. It's not always picture-perfect, sometimes a little messy,
but it's always delicious. Join me in exploring new recipes, savoring the "résultats" and learning from the "erreurs".


Thursday, October 29, 2009

Tablescape Thursday


I was in my local grocery store a couple of days ago and saw these amazing flowers on sale.  The color was gorgeous, and I just couldn't resist bringing them home.  Even though they do not exactly epitomize autumn, I decided to plan my tablescape around these beauties, anyway.  As I started pulling the table together, the wind started howling outside (um, yeah, outside... I guess that's a given...) and the tv news announced that we were under a tornado watch.  Thankfully, a funnel cloud had not been spotted (yet), so I was not to be deterred.  It occurred to me that there was a nice contrast to what was happening on my table to what was happening outside.  I like that!

The many inspiring tablescapers had me looking around the house to see what else I could add to my table.  I remembered my little girl who oversees one of my guestrooms:

(Can you see where I singed some of the petals when I lit the votives??! Yikes!)


Dinner plates & bowls:  Dansk
Salad plates:  Sur La Table
Water goblets:  Tuesday Morning
Vase (actually a milkshake glass):  Tuesday Morning
Wine glasses:  Macy's
Flatware:  Pottery Barn
Votive candles:  Pier One
Napkins:  Amazon.com
My girl & the tablecloth:  Have had both for several years

Thank you, Susan, at Between Naps on the Porch for sponsoring another fun Tablescape Thursday!!  Please be sure to check out Susan's tablescape and the tablescapes of all the other talented and creative participants!

Tuesday, October 27, 2009

Clam Chowder

Have I mentioned that it's been a little chilly where I live???  It was actually in the 40's this morning.  In Texas!  In October!!  That's about 20 degrees lower than normal... and I'm loving every bit of it!!  "Chilly" is cozy weather.  And there's nothing cozier, food-wise anyways, than a bowl of hot, thick clam chowder.  It's a recipe I got from my Aunt Joanie many years ago, and it's rich and delicious, making me happy every time I eat it!

It was also a perfect day to make bread.  So I made a boule, thinly sliced a couple of pieces, and toasted them to have with my soup.  The perfect go-with.

Hearty and delicious soup and homemade bread.  NOW I feel cozy!

Clam Chowder

2 tablespoons butter
1/4 cup thinly sliced leeks
1/4 cup finely chopped onion
1/4 cup diced celery
3 tablespoons flour
2 cans clams, reserve broth
1 cup milk
1 cup cream
1/2 cup diced potatoes
1/2 teaspoon Worcestershire
1/2 teaspoon salt
1/2 teaspoon fresh thyme, minced
3 drops Tabasco sauce
dash black ground pepper

Heat butter in 4 quart pot.  Saute leeks, onion, and celery 6 to 8 minutes.  Add flour to mixture and cook 2 minutes.

Add enough water to reserved broth to make 2 cups of combined liquid. Add to vegetable mixture.

Scald milk and cream.  Add to soup, and stir in potatoes, Worcestershire, salt, thyme, Tabasco, and pepper.  Bring to boil.  Reduce heat and simmer 25 to 40 minutes, or until potatoes are tender.  Add clams, cooking an additional 5 minutes.  Serve.

Note:  This soup freezes well.


For Printable Recipe, Click Here

Sunday, October 25, 2009

Vanilla Yogurt Cake with Orange Glaze

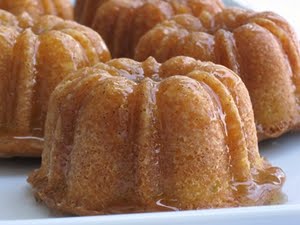
I'm on a mini-loaf kick these days.  I saw this on one of the food photo sites, and my mouth immediately started watering.  I love orange.  More than lemon.  I love the way the house smells when something orange is baking.  It's bright and comforting all at once.  I added the orange zest of half a tangelo to the cake batter, and the zest of the other half of the tangelo to the glaze.  As usual, I made a slight mistake when putting this together.  The recipe calls for 4 tablespoons of orange juice, divided.  Goofy me, I added all 4 tablespoons to the batter, instead of reserving 2 tablespoons for brushing over the loaves when they came out of the oven.  It didn't harm the cake at all, though it did take a few extra minutes to bake thoroughly.  And I still brushed the juice called for over the cakes while they were still hot.

Overall, I love this cake.  I love the way it looks, the way it smells, and more importantly, the way it tastes!!  It's moist and perfect with a cup of tea or, like today, with my morning coffee.  Yum!


Vanilla Yogurt Cake with Orange Glaze

1 egg
1 egg yolk
1 cup granulated sugar
1 vanilla bean, seed scraped out, pod discarded
1-1/2 tablespoons vanilla extract
grated zest of half an orange (or tangelo)
1/2 cup vegetable oil
1-2/3 cups all purpose flour
1/2 teaspoon baking powder
1/4 teaspoon baking soda
1/2 teaspoon salt
7 ounces Greek yogurt

4 tablespoons orange juice, divided

Spray two 6 x 3.2 x 3.4 inch loaf pans with baking spray. Or coat with butter and flour.

Preheat oven to 350F.

Using a stand mixer (or a large bowl and and electric hand mixer), beat together the egg, egg yolk, and sugar on medium-high speed, until it turns pale yellow, about 3 minutes. Add the vanilla beans, vanilla extract, oil, and zest, and beat another minute, until fully incorporated.

In a medium bowl, sift together the flour, baking powder, baking soda, and salt. Set aside.

With the mixer on low speed, add half the amount of dry ingredients. Then add half the amount of Greek yogurt, and 2 tablespoons of the orange juice. Add remaining dry ingredients and followed by the remaining yogurt, reserving the remaining 2 tablespoons of juice until after loaves are baked. Remove from mixer and finish mixing by hand using a spatula until all of the ingredients are fully incorporated.

Pour into prepared pans and bake for 35 - 40 minutes.

Remove from oven. Using a toothpick or large wooden skewer poke holes into the cake. Using a pastry brush, brush remaining 2 tablespoons orange juice over hot loaves.

Let cool for 10 minutes and remove from pan. Place on wire rack to finish cooling. When cool, glaze cakes.

Orange Glaze
3 cups sifted powdered sugar
6 tablespoons orange juice
zest of half an orange (or tangelo)

Combine the two ingredients together with a whisk. Pour over cakes.

Source:  http://www.culinaryconcoctionsbypeabody.com/2009/10/19/like-taffy/#comment-61940

Friday, October 23, 2009

Foodie Friday - It's a Date!


It's Foodie Friday at Designs by Gollum.  Thanks to Michael for hosting this weekly event, and check out all the other participants' posts.  My entry for today's FF centers around dates!  I love them.  They're sweet and chewy and add wonderful flavor and texture to any recipe.  Not able to decide on a favorite recipe using them, I opted for my two favorites.  Both of these were childhood favorites.


The first is Date-Nut Bread.  I think my grandmother actually used to make this.  I know my mom still makes it.  It's delicious, a perfect accompaniment to a turkey dinner - to any dinner!  Date-Nut Bread is wonderful alone, buttered, or (my favorite) with cream cheese!


 Date-Nut Bread

1-1/2 cups chopped dates
1-1/2 cups boiling water
1 tablespoon shortening
1/2 cup brown sugar
1 egg
2-1/4 cups flour
1 teaspoon baking soda
1/2 teaspoon salt
1 cup coarsely chopped nuts (I use either pecans or walnuts)

In a small bowl, pour the boiling water over the dates and let cool.

Preheat oven to 350 F.  Grease a standard loaf pan (or 3 mini loaf pans).

Mix shortening, brown sugar, and eggs.  Add cooled date mixture.

Combine flour, salt and baking soda, and stir into date mixture.  Stir in nuts.  Pour batter into prepared pan(s).  Bake standard-sized loaf for 60 - 70 minutes, mini loaves for about 40 - 45 minutes, or until a wooden toothpick inserted in center of loaf comes out clean.  Cool on wire rack.


My other favorite date recipe is Date-Nut Balls.  My brother was just talking the other day how much he loves these confections and hadn't had them since we were kids.  Perfect!  I can make them and give them away, which is a little kinder to my hips (and my hips need all the kindness they can get!!)


Date-Nut Balls

1/2 cup butter
1 cup granulated sugar
1 egg
1-1/2 cups chopped dates
1-1/2 cups chopped nuts
2 cups Rice Krispies cereal
shredded coconut

Combine butter, sugar and egg into a saucepan.  Bring to a boil.  Remove from heat and stir in dates, nuts, and cereal.  Form into balls, squeezing mixture together.  Roll in coconut.

Thursday, October 22, 2009

Tablescape Thursday - Ready for Fall


It's autumn.  It's often kind of difficult to tell in this area of the country.  We often have high temperatures, into the 90's.  But the temps have been unusually cool for us, 60's and 70's, occasionally into the 80's, but very fall-like.  I miss the autumns of my youth, back home in the lower Hudson Valley region of New York.  The beautiful trees as their leaves change color, making them look like they're golden or on fire!  Well, we generally don't have that kind of fall beauty here, but I thought I would give my simple little table just a bit of fall color.  A few pretty little pumpkins, chocolate-hued tablecloth and napkins, bronze leave napkin rings, a spicy candle.  Fall is in the air and it's landed on my table!


Tablecloth and napkins:  Ralph Lauren
Flatware:  Target
Stemware:  Denby
Dinner plates: Smartbargains
Dessert plates: Cypress Home
Napkin rings:  Target
Candle/ candle dish: :Tuesday Morning

Tablescape Thursdays are sponsored by Susan of Between Naps on the Porch.  Her amazing tablescapes are beyond envy but inspiring.  My own tablesettings are pretty simple, but she has inspired me to be on the lookout for all the accoutrements to make a table more interesting.  Check out her blog to see her tablescapes as well as that of all the other participants of Tablescape Thursdays.  Thank you, Susan!!


Wednesday, October 21, 2009

Sweet Potato Chips with Chili-Lime Salt


I saw Giada deLaurentiis make beet and sweet potato chips on a recent episode.  I didn't have any beets on hand, but I did have some sweet potatoes.  I used an inexpensive mandoline to slice a sweet potato very thin.  And it only takes the chips a couple of minutes to fry up.

Now the other thing Giada did with the chips was to season them with an herb & garlic flavored salt.  Well, I didn't want rosemary on my sweet potato chips (not this time, anyway).  What sounded good to me was a little chili powder-flavored salt.  Oh - and how about some lime?  And let me tell you... THAT was good!  A little goes a long way.  So, so good.  A nice little snack or side to your burgers and sandwiches.  Don't you love serendipity?

Sweet Potato Chips with Chili-Lime Salt


Vegetable oil

2 tablespoons kosher salt
1/2 - 1 teaspoons chili powder
grated zest of 1 lime
1 sweet potato


Heat 2 to 3 inches of oil in a deep pan to 350 F.

Mix the salt, chili powder, and lime zest well.  Set aside.

Slice the sweet potato very thin.  Fry a scant handful of chips at a time.  (This makes sure that you don't lower the oil temperature too much at one time.)  Fry about 2 minutes.  Edges will curl up and chips will turn slightly golden (some will turn very golden!)  Remove chips with a spider or large slotted spoon to a cooling rack set over a baking sheet.  Sprinkle with seasoned salt while still hot.  Repeat with remaining chips.

Tuesday, October 20, 2009

Homemade Hamburger Buns

I was in the mood for a good old-fashioned hamburger today.  Nothing fancy.  No bleu cheese in the middle of the meat.  No horseradish or onions mixed with the meat.  No sauteed onions or mushrooms, no guacamole.  Just a burger.  A burger with a thick slice of a beefsteak tomato and the crunch of a slice of red onion.  And, of course, a great hamburger bun.  Fortunately, I have a recipe for just such a bun that I discovered at www.blisstree.com.  And it doesn't take all day to make.  In fact, it only takes about an hour, start to finish.  You can sub some wheat flour for some of the unbleached all-purpose flour.  You could make hot dog rolls with the same dough.  You can leave them plain, or top them with sesame seeds, poppy seeds, minced onion, whatever floats your boat!  I've made this recipe three times already and have had success with it every time.  You've got to try them!


Homemade Hot Dog or Hamburger Buns

1 cup milk
1/2 cup water
1 tablespoons honey
1/4 cup unsalted butter
1 egg, room temperature
4 1/2 cups flour  (unbleached, whole wheat, or a mix)
1 package instant yeast (2-1/4 teaspoons)
1 1/2 teaspoons salt

Heat the milk, water, honey and butter until butter is melted. Check temperature. Depending on the temperature, let cool to 120F. Carefully beat in egg.

Mix 2 cups of the flour, yeast, and salt. Mix into the milk mixture. Stir in the rest of the flour, 1/2 cup at a time. Beat well after each addition.

When the dough pulls together, (it will form a soft ball) turn it out onto a floured surface and knead until smooth and elastic. This should take about 5 minutes.

Divide dough into 12 -16 equal pieces. This will depend on the size you want for the finished bun. Shape into smooth balls, flatten slightly, and place on a silpat covered baking sheet.

Let rise for 30 to 35 minutes. When buns have almost doubled bake at 400 degrees for 10 to 12 minutes.

If you are making hot dog buns I find it easiest to roll the dough out into a large rectangle and cut into smaller rectangles. Let rise with sides touching.

You can brush the tops with egg wash and sprinkle with poppy seeds, sesame seeds, coarse sea salt, or whatever you like. You can add dry onion soup mix for onion rolls. These are very versatile!

Makes 12-16


Source:  http://www.blisstree.com/bakingdelights/easy-perfect-homemade-hamburger-or-hot-dog-buns/

Monday, October 19, 2009

Vanilla Panna Cotta with Pomegranate Arils and Drizzled Honey

I love pretty desserts.  And this one has to be one of the prettiest I've made in quite some time.  I found the recipe on an interesting blog, Tribeca Yummy Mummy.  Cate has taken it upon herself to share her chef experience with the pre-K set (and their respective maternal units).  She highlights the parts of her recipes that can be done by or with the little ones.  Her recipes give youngsters exposure to foods beyond PB&J, while still intriguing the "Where-did-I-leave-my-keys-again??" population.  And this panna cotta is a great representation of her recipes

I have never made panna cotta before.  I couldn't believe how quickly this came together.  I think it took all of 10 minutes between deciding to make this and getting the full ramekins into the fridge.  I had Stoneybridge Greek yogurt (a wonderful yogurt if you haven't yet tried it) available and used that.  The resulting dessert is creamy, flavorful, and beautiful to behold.  This is definitely going into my permanent repertoire!  Thanks, Cate!


Vanilla Panna Cotta with Pomegranate Arils and Drizzled Honey


2 tablespoons water
1-1/2 teaspoons gelatin
2 cups heavy cream
1-3/4 cups yogurt, whole milk preferably
pinch of salt
1/3 cup honey, or more to taste (plus additional for drizzling
2 t. vanilla
1 teaspoon orange flower water
the arils (seeds) of one fresh pomegranate

Measure the water into a small liquid measuring cup. Sprinkle the gelatin over the water and set it aside for the time being.

While the water sets, whisk together the yogurt, pinch of salt, honey, vanilla, and orange flower water together in a large bowl (a pouring lip is helpful for this recipe) is or very large liquid measure. Set this aside, too.

Pour the cream into a medium saucepan.

Bring the cream to a boil over medium heat, whisking a bit. As soon as the cream comes to a boil, remove it from the heat.

Pour the gelatin mixture into the cream and whisk them together well for a full minute to make certain that they are properly combined. Pour the cream mixture into the yogurt mixture.

Whisk the two mixtures together.

Pour the panna cotta into little sake cups or ramekins. Let the cups cool to room temperature. Place the little cups onto a rimmed baking sheet or tray. Cover the whole business with plastic wrap and place in the refrigerator for at least 5 hours or overnight.

When you are ready to serve your panna cotta, take them out of the fridge, sprinkle them with the pomegranate arils and drizzle on a bit more honey.


Source:  http://tribecayummymummy-cate.blogspot.com/


Panna Cotta on Foodista

Baked Mushroom Risotto


Thanks to Ann, Mari, and Linda, I had to give baked risotto a try. The method is simple enough: stir arborio (or other short-grain rice suitable for risotto) into some stock/broth and bake for about 45 minutes. Add grated parmesan and butter, season with salt & pepper, and 'Bob's your uncle'.

Since this was going to be my dinner, I first sauteed a rather large shallot in some olive oil, then added the rice, then stirred in the stock and baked. And as most suggested a need to add more stock at the end of the baking time, I decided to up the moisture quotient at the beginning and added a whole cup more than originally recommended. My baking time was right at 45 minutes and there was no dryness to compensate for. I added in the parmesan, butter, salt & pepper, and sauteed shiitakes that I had already seasoned with fresh thyme. Oh my. It was amazing (and I must say - even better the next day... a great plan ahead dish!)

Okay... it's not exactly like traditionally cooked risotto, but it's close enough when I'm not up for a marathon stirring session. Thanks to all my blogging friends for their baked risotto experience. I am happily better for it!

Baked Mushroom Risotto

2 tablespoons olive oil
2 large shallots, chopped
3 cups arborio rice
7 cups chicken stock
8 tablespoons butter, divided
1 pound shiitake mushroom, stemmed, sliced
1 tablespoon fresh thyme, minced
2 cups grated parmesan cheese
salt, to taste
freshly ground black pepper, to taste

Preheat oven to 375 F.

Heat the olive oil in a large Dutch oven, and saute the shallots until translucent. Add the rice and stir, coating the rice evenly with the oil. Stir in stock, cover the Dutch oven with its lid and place in oven, cooking for 45 minutes. (Stir once or twice during cooking.)

Saute sliced mushrooms in 2 tablespoons of butter. Season with salt & pepper and thyme. Set aside.

When rice is finished baking, remove from oven and stir in parmesan cheese and remaining butter. Stir in mushrooms; check for seasoning, adding additional salt & pepper as needed. Serve.

12 servings

Saturday, October 17, 2009

Blueberry Coffeecake

I found a coffeecake that looked so delicious on a blog I happened upon, Stick to Your Hips. It's a pretty site with delicious-looking and -sounding recipes. Her recipe for Special-Morning Coffee Cake was particularly appealing this morning, and so off I went to the kitchen to experiment with this recipe.

I had some blueberries stashed in the freezer, and thought they would go well with this cinnamon-y treat. They did! My other little change was a mistake. As the cake was baking, I noticed that while it smelled wonderful, I was missing that waft of cinnamon that should have been emanating from my oven... And then I realized... I had forgotten to add the cinnamon to the topping. Horrors! Now what was I going to do?? The cake only had about 10 minutes of oven time left, so I decided to mix the cinnamon with a couple of tablespoons of granulated sugar and sprinkled that over the top of the cake. Ah - there was that aroma I was waiting for. I will do my best to remember the cinnamon in the topping next time, but I think I will also add a little cinnamon-sugar to the top of the cake, as well. Definitely a delicious breakfast treat!

Blueberry Coffeecake

Shortening (for greasing baking pan)
1/4 cup butter, softened
1/4 cup flour
1/4 cup brown sugar
1/4 cup sugar
1 teaspoon cinnamon

1-1/2 cups flour
2 teaspoons baking powder
1/2 teaspoon salt

1 egg
3/4 cup sugar
1/3 cup butter, melted
1/2 cup milk
1-1/4 teaspoons vanilla
3/4 cup blueberries

1 teaspoon cinnamon
2 tablespoons sugar

Preheat oven to 350 degrees. Coat a 9-inch springform pan with the shortening and set aside.

In a small bowl, with a fork, mash together the softened butter, 1/4 cup flour, brown sugar, sugar, and cinnamon. (It will be more creamy instead of dry like a traditional streusel, causing the clumps to fall into the cake instead of sit on top.)

In a small bowl combine the 1-1/2 cups flour, baking powder, and salt. Set aside.

In a large bowl beat the egg and 3/4 cup sugar until fluffy. Beat in the melted butter, milk, and vanilla. Add the flour mixture all at once and stir together just until incorporated. Gently stir in blueberries. Don't overmix.

Pour into prepared pan and dot the surface with the brown sugar mixture. Mix 1 teaspoon of cinnamon with 2 tablespoons sugar. Sprinkle over batter. Bake for 25-35 minutes or until moist crumbs cling to a toothpick inserted in the middle.


Adapted from sticktoyourhips.blogspot.com

Wednesday, October 14, 2009

Zucchini Bake

This is another one of my mother's recipes. I've always loved this dish, but her recipe calls for Bisquick, a product I don't usually keep in the pantry. I looked up some recipes online for a homemade version and was able to substitute the ingredients needed to make up the rest of the recipe in lieu of using the Bisquick. Still easy, still delicious. Not creamy like a quiche, but still a little eggy. Perfect as a side dish, or wonderful as a light lunch or dinner. Thanks again, Mom!!

Zucchini Bake


1 cup unbleached all-purpose flour
1/2 cup grated parmesan cheese
1 teaspoon baking powder
1 teaspoon salt
1/8 teaspoon black pepper
3 tablespoons shortening
1/4 cup olive oil
4 eggs, beaten
3 cups thinly sliced zucchini
1 small onion, chopped (or halved and thinly sliced)

Preheat oven to 375 F.

Mix flour, cheese, baking powder, salt and pepper. Cut in shortening. Mix in olive oil and beaten eggs until batter is pretty smooth. Blend in zucchini and onion.

Pour into greased pie plate, making sure zucchini and onions are layered evenly around dish. Bake for 30 - 35 minutes, or until top is lightly golden.
Blog Widget by LinkWithin