One woman's foray into cooking for herself, for her family, and for her friends. It's not always picture-perfect, sometimes a little messy,
but it's always delicious. Join me in exploring new recipes, savoring the "résultats" and learning from the "erreurs".


Friday, February 26, 2010

Saturday Blog Showcase #8 - Blueberry Squares


It's time for our eighth edition of Saturday Blog Showcase!  Join Ann (Thibeault's Table) and me in showcasing recipes from our fellow bloggers.  To participate in the fun:

  1. Make a recipe from another blog on any day of the week.  Create a link to that blog in your post.
  2. Add the Saturday Blog Showcase logo to your post.
  3. On Friday night or Saturday, link your post to Mr. Linky.


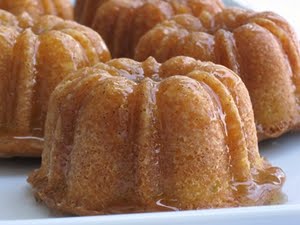
Today I borrowed a recipe from Asha at Fork-Spoon-Knife. Her Cranberry Squares (aka Fruit Squares) looked delicious and the recipe looked so easy, a prerequisite as I started a new job this week!  I made the squares with blueberries instead of the cranberries and iced them with a simple glaze of confectioners' sugar, cream, and vanilla extract.  As part of my 'orientation' at the new office, I decided to bring these in to help introduce the newbie to the rest of the staff (thus no photos of them cut into squares - sorry!).  It was a good move. The president of the company was getting coffee as I dropped the squares off in the breakroom.  He wasted no time cutting into them.  (I also found out he's a foodie, too!)  Within minutes of returning to my desk, he had emailed the whole office about the squares and how delicious they were!  :D  Thanks, Asha, for making my first week at the office that much smoother!

Blueberry Squares (Fruit Squares)
(adapted from CD Kitchen)

** Asha's Note: I used a 8 inch square pan, so my squares turned out a bit thick. You could easily spread this on a 9x13 inch pan **

1-1/2 cup sugar
2 eggs
1 stick (1/2 cup) unsalted butter, melted and cooled
1 teaspoon almond extract
1-1/2 cup flour
2 cup fresh blueberries or cranberries or other berries
1/2 cup chopped, toasted cashew nuts (optional)

Preheat the oven to 350 degrees. Butter the pan you are using.

In a large bowl, beat the sugar and eggs until creamy and smooth. Whisk in the melted butter and almond extract. Add flour and fold until incorporated. Fold in blueberries and nuts (if using) carefully so as not to break the fruit and color the whole batter purple.

Pour batter into prepared pan. Bake for about 40-50 minutes or until tester inserted into center comes out clean. Transfer to a rack to cool completely (takes about an hour really!). Cut squares and serve.


Saturday, February 20, 2010

Saturday Blog Showcase #7 - Vanilla-Scented Granola


It's Saturday Blog Showcase time again.  Thank you to Ann (Thibeault's Table) for hosting this week.  To participate, make a recipe from a blog other than your own any day of the week.  On Saturday, place the Saturday Blog Showcase logo on your post, and link back to Mr. Linky.  That's all there is to it!


I've been in the mood for a good granola.  When I saw the Vanilla-Scented Granola on Dishing Up Delights, I couldn't resist!  I LOVE the aroma of vanilla, and the recipe seemed easy enough (I've been in a very lethargic mood for some reason this week!)  I wasn't disappointed.  The recipe was extremely easy, and the scent of vanilla and toasting almonds with a touch of cinnamon was heavenly.  Once it was removed from the oven, I could hardly wait for it to cool down to munch on some.  While it was cooling, I decided I was going to add some dried fruit to the mix, so I added in about 1/2 cup of chopped dried apricots and 1/2 cup dried cranberries.  I've got a delicious cereal and snack for a few days!  Yay!  Thanks again to Dishing Up Delights!

Vanilla-Scented Granola
Makes 2 cups

Nonstick vegetable oil spray
2 cups old-fashioned oats
1 cup sliced almonds
1/4 cup golden brown sugar
1/4 teaspoon salt
1/4 teaspoon ground cinnamon
3 tablespoons vegetable oil
2 tablespoons honey
1 tablespoons sugar
2 teaspoons vanilla extract

Position rack in middle of oven and preheat to 300 degrees. Lightly spray large baking sheet with nonstick spray. Mix the oats, almonds, brown sugar, salt, and cinnamon in large bowl. Combine oil, honey, and sugar in small saucepan; bring to simmer over medium heat. Remove from heat; stir in vanilla. Pour hot liquid over oat mixture; stir well. Using hands, toss mixture until thoroughly mixed.

Spread granola on prepared baking sheet. Bake until golden brown, stirring occasionally, about 30 minutes. Transfer sheet to rack; cool granola completely. (Can be made 2 weeks ahead. Store in airtight container at room temperature.)
 
Source:  Dishing Up Delights

Friday, February 12, 2010

Saturday Blog Showcase #6 - Chicken Satay


I hope you will join Ann (of Thibeault's Table) and me in participating in the sixth edition of Saturday Blog Showcase.

If you would like to participate, just:
  1. Make a recipe from another blog on any day of the week.  Create a link to that blog in your post.
  2. Add the Saturday Blog Showcase logo to your post.
  3. On Friday night or Saturday, link your post to Mr. Linky.


I stumbled upon a mouth-watering blog called Dishing Up Delights, full of delicious-sounding recipes and gorgeous photographs.  One of the recipes that struck me was Esi's Chicken Satay with Peanut Sauce.  I love satays and was anxious to try this version.  The marinade was so easy - just throw everything in the blender - and the aromas of gingerroot and garlic were heady.  I took one very large chicken breast and cut it into 1/4-inch thick slices, marinating the chicken slices for about 45 minutes.  Using a grill pan, I cooked the chicken til they were done but not dry.  The peanut sauce ingredients all went into a small saucepan over low heat until the peanut butter was melted and the sauce was smooth.  I did doctor the sauce just a bit.  I used lime juice instead of lemon, added about 1/4 teaspoon of sesame oil, along with a pinch of salt.  It was delicious.  Such an easy recipe with big taste!  Love that!!

Chicken Marinade

1/2 small onion, chopped
2 garlic cloves, grated
1 tablespoon ginger root, grated
2 tablespoons lemon juice
1 tablespoon soy sauce
1 teaspoon ground coriander
1 teaspoon ground cumin
2 tablespoons vegetable oil
1 pound of chicken thighs, cut into cubes

In a food processor or blender, dump in everything except the chicken and blend until smooth.

Cover chicken with marinade. You can place the chicken into a bowl, cover/seal and chill, or place the whole lot of it into a ziploc bag, seal and chill.

If using wooden or bamboo skewers, soak your skewers in warm water for at least 20 minutes before preparing skewers.

Gently and slowly slide meat strips onto skewers. Discard leftover marinade.

Broil or grill a 8-10 minutes per side or until the edges just start to char. Flip and cook another 8-10 minutes.

Peanut Sauce

3/4 cup coconut milk
1/4 cup peanut butter
1 tablespoon lemon juice
1 tablespoon soy sauce
1 tablespoon brown sugar, plus more to taste if desired
1/2 teaspoon ground cumin
1/2 teaspoon ground coriander
1/2 teaspoon red pepper flakes

Mix the brown sugar, cumin, coriander, and red pepper flakes in a small bowl. Add soy sauce and lemon, mix well.

Over low heat, combine coconut milk, peanut butter and your soy-lemon-seasoning mix. Mix well, stir often.

All you’re doing is melting the peanut butter, so make your peanut sauce after you’ve made everything else in your meal, or make ahead of time and reheat.

Source:  Dishingupdelights.blogspot.com


* * * * * * * * * *


Winter Wonderland, Texas-Style


We had a historical snowfall yesterday - most snow ever in a single day in the Dallas/ Fort Worth area.  I grew up in New York and have seen much more than this, but I've only seen something close to this snowfall once in the 30 years I've lived here in Texas.  We often have snow-less winters here.  But this was a beautiful day, especially since I could stay in and enjoy the Ansel Adam-esque scenes in my own back yard.


The two rosemary bushes on either side of my sidewalk became so laden with snow, they caved in over each other across the entryway to my front door.  If the snow doesn't melt by this afternoon, I'll have to rescue them.  Until then, I'll just enjoy the view...


I miss the winters of my youth... but, of course, I wasn't in charge of shoveling the walkways and the driveway. I remember those winters wistfully, when we built snowmen and snowdogs (!), went sledding down the big hill behind my parents' house, or ice skated on the ice formed over the little swampy area at the end of the neighborhood!  It was fun for my siblings and I - probably not so much for my mother who took care of all those layers of snowy, wet jackets and sweaters and scarves and hats and mittens and socks.  But I do remember warming up in front of the fireplace with homemade donuts and cider afterwards...  That's the good thing about memories:  they can stay just as homey as we want them to be!

Thursday, February 11, 2010

Tablescape Thursday - Tea Time


It's snowing in Dallas! I've got about 4 inches in my backyard, and it's still coming down. It's cozy weather (in my humble opinion), and all I want is a good book and a simple tea:


Tray:  gift from a dear friend
Teapot: gift from my mother
Lovebirds:  Dollar Tree
Teacup & saucer, napkin ring:  eBay finds
Napkin:  Amazon.com


* * * * * * * * * *

Thank you for joining me for Tablescape Thursday, and many thanks to Susan of Between Naps on the Porch for hosting.  Please visit her site to see all the other participants and their lovely tablescapes!

Tuesday, February 9, 2010

Flammkuchen


Thanks to Dana (of Danalicious) and Ann (of Thibeault's Table), I finally tried this Flammkuchen.  To my mind, it's basically a German pizza.  A thin crust, topped with a seasoned creme fraiche, sauteed onions, and crisp pieces of bacon.  Doesn't the sound of that just evoke a heavenly aroma??!

I have to admit that I bastardized the recipe a bit.  Just a bit.  I made a regular pizza dough that I let proof for a couple of days in the refrigerator for the base.  And since I had no creme fraiche on hand, I decided to use sour cream to coat the crust.  No harm, no foul.  It worked perfectly.  The other thing I changed was to bake the crust for about 12 minutes before adding the sour cream and toppings.  The crust was nice and crispy, and the topping was amazing, with the sweet onions and the salty, smoky bacon.  Absolutely delicious!  I never would have thought that something so relatively simple good be so good - I was surprised!  Thanks so much to Dana for discovering the recipe and recommending it to all of us!!

Flammkuchen
(from Beyond Burgers and Bratwurst)

For dough*:
2 cups Flour
2.5 Tbsp Oil
2/3 cup Water
1/4 tsp salt

For topping:

1 cup crème frâiche (I used sour cream)
1 onion (can be red or sweet onions)
1 tablespoon butter
1/4 pound bacon
salt & pepper to taste
1 clove garlic

Preheat the oven to 450F.

Combine ingredients for crust. The dough shouldn’t be sticky and should turn smooth and slightly stretchy. Roll out the dough as thinly as possible and place on a baking sheet or pizza pan or stone.  (*I used a French bread dough, letting it rise as usual.  I rolled out a about one-third of the dough into a circle and placed it on a perforated pan and baked at 500 F. for 12 minutes.  I then topped the crust and returned the crust directly to a baking stone - without the pan - for an additional 10 minutes.)

Thinly slice onions and sauté in butter until clear (don’t caramelize). Cook bacon until crisp. (Original author's note:  I prefer to cook bacon in the oven for a nice even crispness.) Finely chop garlic and add it with seasonings to the cream.

Spread the creme fraiche over the rolled out dough and top with the bacon and onions.

Bake for around 10-15 minutes, or until the dough has begun to create bubbles and you see nice browning (you don’t want burnt!).

Saturday, February 6, 2010

Saturday Blog Showcase - Cornstarch Waffles


Welcome to the fifth edition of Saturday Blog Showcase!!  Ann (Thibeault's Table) is hosting this week  Be sure to sign in on Mr. Linky at her blog to join in on the fun!

This week I decided on these Cornstarch Waffles from Cooking Stuff.  Bob wasn't entirely thrilled with these when he made them, but I was interested in seeing what the cornstarch did to the texture of the waffles.  The waffles were light, crispy on the outside and very tender on the inside.  Quite delicious.  To be honest, it won't replace my standard recipe for waffles, but it was a slightly different change of pace and a little easier to make than my recipe.  And to be fair, the taste was quite good!  The kitchen smells like I've been making pastries.  How great is that?!  Thanks, Bob -

Cornstarch Waffles

3/4 cup all-purpose flour
1/4 cup cornstarch
1/2 teaspoon baking powder
1/4 teaspoon baking soda
1/2 teaspoon salt (or a bit less)
1 1/2 teaspoons sugar
1 cup whole milk or buttermilk
1/3 cup vegetable oil or melted butter
1 egg
3/4 teaspoon vanilla

Combine the flour, cornstarch, baking powder, baking soda, salt and sugar. Add the oil, vanilla, egg and milk. Mix well. Let it rest for a half hour. Make the waffles according to your iron's directions.

 Source:  icookstuff.blogspot.com


Wednesday, February 3, 2010

Tablescape Thursday - A Touch of Taupe

This week I went with a taupe theme.  It didn't take long to scour the house and find all the items decorating my table.  The only thing I ended up getting were the salad plates, a Target bargain find at $7 for 4 plates.  Can you tell I love taupe?!


I did purchase the flowers for the table - $4 for the bunch at my local grocery store:


These hat boxes and little French figurines normally sit atop the armoire in my bedroom.  I brought them down to oversee my table:


I found this little box at an antique store that was going out of business a few months ago.  It was love at first sight!


The pineapple, when not decorating my table, keeps company atop my bedroom amoire with the hat boxes and figurines:


This little keepsake box was a steal at Pier 1 many years ago:


The matelasse tablecloth was purchased about 15 years ago from either Neiman-Marcus or Horchows's.  I love being able to mix the few higher end items I have with my everyday bargains!


Hat boxes:  Michael's
Figurines, pineapple finial: Haverty's
Round keepsake box:  Pier 1
Rose bowl, rectangular box: local antique stores
Candlestick lamp: Weir's
Wine glasses: World Market
Flatware: Tuesday Morning
Cream napkins, napkin rings, salad plates: Target
Taupe napkins: Amazon.com
Dinner plates: Macy's
Tablecloth:  I purchased this many years ago at either Neiman-Marcus or Horchow's


* * * * * * * * * *
 

A big thank you to Susan at Between Naps On the Porch for hosting Tablescape Thursday.  Please visit her site to see all the other participants' beautiful tablescapes!

Tuesday, February 2, 2010

Blueberry Upside-Down Cake

Today I made another one of Ann's (Thibeault's Table) recipes.  Her never-fail recipes didn't disappoint once again.  This easy blueberry creation is a little different from most coffeecakes in that it bakes 'upside-down'.  When you turn it right-side up, those beautiful blueberry juices run down the sides of this delicious cake.  A little whipped cream on the side, and it's the perfect dessert, tea treat, or midnight snack!  Thanks again, Ann!

Blueberry Upside-Down Cake

1/4 cup melted butter
1/2 cup brown sugar
2 cups blueberries (fresh or frozen)
1 tablespoon lemon juice
1/2 cup butter
3/4 cup granulated sugar
1 egg
1 teaspoon vanilla
1-1/3 cups all-purpose flour
2 teaspoons baking powder
1/4 teaspoon salt
1 teaspoon cinnamon (optional)
3/4 cup milk

In 9-inch square cake pan, combine melted butter and brown sugar;spread evenly on bottom. (Brush a little of the melted butter on the sides of the cake pan before adding the sugar.)  Spread blueberries evenly over top. Sprinkle with lemon juice.

Cream butter; gradually add sugar, beating until light. Beat in egg and vanilla. Sift or mix together flour, baking powder, salt and cinnamon if using. Add dry ingredients alternately with milk to creamed mixture. Spread batter evenly over blueberry layer. Bake in 350°F oven for 45 to 50 minutes or until toothpick inserted in centre comes out clean. Let cool 10 minutes in pan, then turn out on to large flat plate.


Source:   Canadian Living Magazine, August 1983 via Ann/ Thibeault's Table

Monday, February 1, 2010

Union Square Cafe Bar Nuts

Annie at From the Bookshelf reminded me of this wonderful snack when she made this recipe last week.  The nuts are toasted first then seasoned with fresh rosemary and cayenne, sea salt and brown sugar.  It's Nigella Lawson's version of the bar nuts at the Union Square Cafe in New York City.  They are at once spicy and salty and slightly sweet.  With everyone looking for snacks for the big game this weekend, these will fit right into any Super Bowl menu.  Make sure you double the recipe - they're addictive!

Union Square Cafe's Bar Nuts

18 ounces (2-1/4 cups) assorted unsalted nuts
1 tablespoon butter, melted
1/2 teaspoon cayenne
2 teaspoons Maldon's sea salt
2 teaspoons brown sugar (I used muscovado sugar)
2 tablespoons fresh rosemary,coarsely chopped

Preheat oven to 350 F.

Spread nuts on a baking sheet and toast in the oven until they are lightly browned, about 10 minutes.

In a large bowl, combine the melted butter, cayenne, sea salt, brown sugar, and rosemary.  Thoroughly combine toasted nuts with the spiced butter and serve warm.


Source:  Nigella Bites, copyright 2002

Blog Widget by LinkWithin