One woman's foray into cooking for herself, for her family, and for her friends. It's not always picture-perfect, sometimes a little messy,
but it's always delicious. Join me in exploring new recipes, savoring the "résultats" and learning from the "erreurs".


Saturday, June 11, 2011

Rigatoni with Broccoli, Garlic & Breadcrumbs

Whenever I visit New York City with my friends and family, we often visit our favorite Italian restaurant there - Carmine's.  The mid-town Manhattan location is always busy, especially with the many Broadway patrons before and after shows.  I've even had the opportunity to bump into some of Broadway's biggest stars (I once saw Patty Lupone!) 

The food is always wonderful and plentiful, just like most Italian homes, whether it's one of their wonderful salads, hot or cold appetizers, delicious meat dishes, or, of course, the many pasta dishes they offer.  One of my daughter's favorites is their Rigatoni with Broccoli, Garlic & Olive Oil which comes sprinkled with toasted breadcrumbs and grated Parmegiana-Reggiano.  It's a delicious non-meat entree that will satisfy even the dedicated carnivores at your dinner table. 


Rigatoni with Broccoli, Garlic & Breadcrumbs
Serves 4

3/4 to 1 pound broccoli florets
1 pound rigatoni
5 tablespoons olive oil
1⁄3 cup dried breadcrumbs
4 - 6 cloves thinly sliced garlic
1⁄4 teaspoon red pepper flakes
1⁄2 cup grated Parmigiana-Reggiano

Bring a large pot of salted water to a boil.Add the broccoli and cook until just tender, about 5 minutes. Remove with a slotted spoon and drain. Set aside.
 
Bring the water back to a boil and add the pasta.While the pasta cooks, heat 2 tablespoons of the olive oil in a large, deep skillet over low heat. Add the bread crumbs, stirring, until the crumbs are toasted a golden brown. Remove the breadcrumbs to a small bowl and set aside.
 
Return the skillet to the heat and add the remaining olive oil, garlic, and pepper flakes.Cook until fragrant, then stir in the broccoli. Stir to coat with the oil as the broccoli reheats, and taste for seasoning.  If pasta is not yet done, keep the heat low to avoid burning the broccoli.
 
Drain the cooked pasta and add it to the broccoli mixture.Cook over high heat for a minute or so to evaporate any water from the pasta, then stir in the bread crumbs and cheese and serve immediately.


Friday, June 10, 2011

"Duffins"

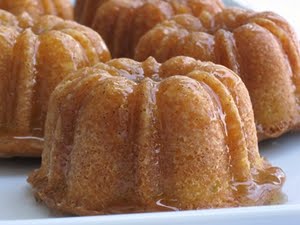
My friend, Marysol, at Memories in the Baking, originally shared the recipe for these little tastes of heaven on an internet cooking forum we both occasionally visit.  "Dirt Bombs" are wonderful muffins dipped in melted butter (sounds good already, right?!), then rolled in cinnamon sugar.  Covered in cinnamon sugar.  Glistening with cinnamon sugar. The coating keeps them moist and, well, irresistible.  My son said they were a cross between a doughnut and a muffin, and so re-named them "Duffins".  Fine by me!  Duffins it is!

Sol's Dirt Bombs
Yields: 12 muffins*

3 cups AP flour, minus 3 tablespoons
1 tablespoon baking powder
1/2 teaspoon salt
1/2 teaspoon ground nutmeg
1/4 teaspoon ground cardamom
3/4 cup (1-1/2 sticks) unsalted butter
1 cup granulated sugar
2 large eggs
1 cup whole milk **

Topping ***
3/4 cups unsalted butter, melted
1/2 cup granulated sugar
1-1/2 teaspoons ground cinnamon

Preheat oven to 400º F. Place the rack in the center position. Generously grease a 12-cup standard muffin pan.

Sift the flour, baking powder, salt, nutmeg and cardamom into a mixing bowl. In another bowl, cream the butter and sugar until light and fluffy. Scrape the bowl down half way through. Mix in the eggs. Add the dry ingredients alternately with the milk in two additions, mixing gently by hand to incorporate all the flour. The batter will be on the stiff side, but airy. Don’t over mix or beat the batter as this will make the muffins tough. Spoon the batter into the prepared pan, without smoothing the tops. Bake for about 25 minutes or until a cake tester inserted in the center comes out clean. As soon as the muffins are cool enough to handle, turn them out onto a wire rack.

Add the melted butter to a bowl. In another bowl, mix the sugar
and cinnamon. Dip the muffins (top, sides and bottom) in the butter, using a pastry brush -if necessary- to cover areas not buttered by dipping. Immediately roll the muffins in the cinnamon sugar mixture. Serve warm or at room temperature.

Sol's notes:
*I've made this twice, and both times, this recipe has yielded 16 muffins instead of 12.
**I substituted whole buttermilk for whole milk because I always have it on hand and prefer it for baking.
*** The amounts listed for the sugar and cinnamon are not quite enough to coat all the muffins, so I recommend you double it.

Saturday, May 21, 2011

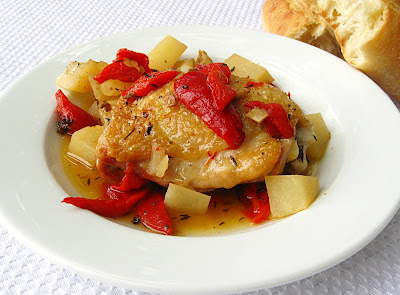
Garlicky Chicken in Red Pepper Sauce

This is another recipe I received in an email from Fine Cooking in their "Make It Tonight" series. It looked really easy, sounded really delicious.  And it was.  Both easy and delicious.  The chicken was so tender and juicy.  The sauce was so flavorful.  And it all came together so quickly.  I love that!  I didn't have fresh thyme on hand, so I substituted about 3/4 teaspoon of dried French thyme.  One other thing - the next time I make this, I will add more potatoes (at least one more, but probably two). Make sure to have a crusty baguette on hand to sop up that amazing sauce. A little starter salad would be a nice addition to round out the meal.

Garlicky Chicken in Red Pepper Sauce
Serves 4

2 Tbs. olive oil
8 bone-in skin-on chicken thighs (about 3 lbs.), trimmed of excess fat and skin
Kosher salt and freshly ground black pepper
6 cloves garlic, smashed
2 tsp. fresh thyme leaves
1 cup lower-salt chicken broth
3 jarred roasted red peppers, drained and cut into 1-inch strips (1-1/2 cups)
1 medium russet potato, peeled and cut into 3/4-inch dice (1-1/2 cups)
1 Tbs. sherry vinegar
Crusty baguette for serving

Position a rack in the center of the oven and heat the oven to 425°F. Heat the oil in a large, oven-proof sauté pan over medium-high heat until it’s shimmering. Sprinkle the chicken with 1-1/2 tsp. salt and 1/2 tsp. pepper. Add half the thighs to the pan, skin side down. Reduce the heat to medium, and cook without touching until the skin browns and easily releases from the pan, about 3 minutes. Turn and cook for 1 minute. Transfer to a large plate. Add the remaining chicken and cook it in the same manner. Transfer the chicken to the plate. Add the garlic and thyme to the pan and cook until the garlic is lightly browned, 2 to 3 minutes. Add the chicken broth, red peppers, potato, and sherry vinegar to the pan, and bring to a boil. Remove from the heat, return the chicken to the pan skin side up, and transfer to the oven.

Braise the chicken, uncovered, until the potato pieces are tender and the chicken is completely cooked through, about 30 minutes.


Source: Fine Cooking

Thursday, May 19, 2011

Tamale Pie


The first cookbook I ever owned as a new bride was Better Homes and Gardens New Cook Book.  I made lots and lots of the recipes contained in that cookbook, many of which remain favorites to this day.  The first few sections introduced me to appliance cooking:  how to use my Crockpot (the Olive Spaghetti Sauce sounds a bit odd but is really good), the Oriental Pork helped familiarize me with my new electric skillet, the Bar-B-Q Meat Loaves (yes, individual meat loaves) made me less intimidated of my little Weber grill.  Coffee cake, Swedish Tea Ring, white bread, pancakes, penuche, Spanish tomato rice (a really tasty rice dish), puddings, pies, roasts, as well as sections on meal planning and ingredient substitutions were the basis of my culinary education.  The pages of BH&G New Cook Book all have the tell-tale splatters of a well-used cookbook in my kitchen.  Admittedly, some of the recipes are dated, but, all in all, I still turn to this cookbook on a fairly regular basis.

In a bit of nostalgia, I decided to look through the book and review some of the recipes I used to make as a novice cook.  The spiral-bound pages are a little worse for wear, but like a neglected grade-school child, one page just fell out of the book as if to say 'Pick me! Pick me!'  The stained page containing the recipe for Tamale Pie floated to the floor, the holes of the page no longer intact to remain in the book of its own accord.

So, Tamale Pie it was.

I actually have a few vivid memories involving this dish.  It was one of the meals I made for my parents when they came from New York to visit their newly married daughter at our first Texas apartment.  Trying to prove to my mother that I could indeed cook, I made this recipe.  Not exactly Beef Wellington, but it came out fine.  Mom and Dad at least feigned approval of my initial cooking abilities.

One time, after simmering the meat and vegetables for the prerequisite 25 minutes, I lifted the pan full of hot ingredients to pour into the casserole dish, and lost my grip.  Hot saucy meat and vegetables went all over the floor of my then-tiny kitchen.  Not pretty.

And I never lift a full pan without making sure I have a good grip on it anymore.  Never.

A couple of changes I made this time (after not making this recipe in easily 15 - 20 years):  I replaced 1/2 teaspoon of the chili powder called for with chipotle chili powder.  It added a wonderful smoky heat to the dish that I really love.  I used a red bell pepper instead of a green pepper (I'm not particularly fond of green peppers...)  The recipe lists a teaspoon of sugar, which I omitted, especially since the red pepper adds its own bit of sweetness.  And I used just a handful of grated Cheddar cheese instead of the 6 ounces used in the original  recipe. (Actually, the original recipe calls for 6 ounces of sharp process American cheese, but I never used processed cheese in the dish.)  The little bit of grated cheese helped bind the meat mixture and was enough for me, but use the whole 6 ounces if it appeals to you.

Retro cooking.  Ya gotta love it!

Tamale Pie
serves 6

1 pound ground chuck
1 cup chopped onion
1 cup chopped red bell pepper
2 8-ounce cans tomato sauce
1-1/2 cups corn (fresh or frozen)
1/2 cup pitted ripe olives, chopped
1 clove garlic, minced
1 teaspoon salt
2-1/2 teaspoons chili powder
1/2 teaspoon chipotle chili powder
Dash black pepper

6 ounces sharp Cheddar cheese, grated

3/4 cup yellow cornmeal
1/2 teaspoon salt
2 cups cold water
1 tablespoon butter

Cook meat, onion, and bell pepper in a large skillet until meat is lightly browned and vegetables are tender.  Stir in tomato sauce, corn, olives, garlic, 1 teaspoon salt, chili powders, and black pepper.  Simmer 20 to 25 minutes or until thick.  Stir in cheese. Turn into a greased 9x9x2-inch baking dish.

Preheat oven to 375 F.

Stir cornmeal and 1/2 teaspoon salt into cold water.  Cook, stirring constantly, until thick.  Add butter, and mix well.  Spoon cornmeal mixture over hot meat mixture.

Bake 40 minutes.


Source:  Better Homes and Gardens New Cook Book, copyright 1968

Monday, May 16, 2011

Southwestern Turkey Wrap


I'm trying to be more frugal these days by taking my lunch to work as often as I can.  Sometimes, that means leftovers if I've cooked something particularly delicious and plentiful (like the General Tso's Chicken of a couple of weeks ago).  But when I happened upon this wrap, it got my attention.  Now, one doesn't normally need a recipe for a wrap. The real recipe here is for the spread that seasons this one.  It's easy, it's delicious, and because of it, definitely takes lunch fare up a notch.  The avocado is optional, but it does add a nice richness and flavor.  Want a satisfying lunch?  Try a Southwestern Turkey Wrap!

Southwestern Turkey Wraps
Makes 4

1/2 cup mayonnaise (not Miracle Whip!)
3 tablespoons chopped cilantro
1 green onion, minced
1 tablespoon minced chipotle
1 teaspoon fresh lime juice

4 10-inch flour tortillas (I've used a sun-dried tomato wrap here)
16 ounces smoked turkey
8 ounces pepper jack cheese
thinly sliced avocado
mesclun (or spring mix salad)
12 thin tomato slices

Spread approximately 2 tablespoons of the chipotle-mayonnaise spread on tortilla. Top with turkey, pepper jack, mesclun, avocado, and tomato slices. Roll fairly tightly, cut diagonally, and serve.


Source:  Contessa's Kitchen

Sunday, April 24, 2011

General Tso's Chicken

While I've seen this dish on the menu of many Chinese restaurants, I've often wondered who was General Tso?  Evidently he was a highly-respected soldier in the Hunan region... a region that appears to have never heard of this recipe.  No matter.  Regardless of the origin of this dish, it is delicious, no matter it's name!  


I came across this version on a wonderful blog called My Adventures in Food.  The recipe is fairly simple, using easily accessible ingredients found in your local grocery store.  And the flavor is outstanding, rivaling any found at your favorite Chinese restaurant.  I'll be making this again and again!

General Tso’s Chicken

1/2 cup hoisin sauce
1/4 cup white vinegar
3 tablespoons soy sauce*
3 tablespoons cornstarch
1-1/2 cups water
1 tablespoon vegetable oil
4 garlic cloves, minced
2 tablespoons fresh ginger, minced**
1/2 teaspoon crushed red pepper flakes

1-1/2 pounds boneless, skinless chicken breasts
3 large egg whites
1-1/2 cups cornstarch
1/2 cup all-purpose flour
1/2 teaspoon baking soda
Vegetable oil for frying

2 green onions, green parts thinly sliced

*I used a light soy sauce.  I found I needed to add about 1/4 - 1/2 teaspoon salt to balance all the flavors.
**I grated the ginger, using a medium-sized Microplane.

To make the sauce, whisk together the hoisin sauce, white vinegar, soy sauce, cornstarch, and water in a bowl. Set aside. Heat oil in a large skillet over medium-high heat. Saute the garlic, ginger, and red pepper flakes until fragrant, about 1 minute. Add the hoisin mixture. Stir until the sauce is dark brown and has thickened. Remove from heat and cover.

Cut chicken into 1-inch chunks. Whisk the egg whites in a shallow dish until foamy. Combine cornstarch, flour, and baking soda in a separate shallow dish. (I whisked the dry ingredients to really blend them.) Toss half the chicken into the foamy egg whites until well-coated, and then dredge the chicken in the cornstarch mixture, making sure all sides are coated. Transfer chicken to a plate and repeat with remaining chicken.

Heat oil in a fryer (or Dutch oven, or a large wok) until it registers 325ºF. Fry the chicken in batches until golden brown, about 3 minutes, turning pieces over halfway through cooking. Transfer cooked chicken to a paper towel-lined baking sheet to drain.

Re-warm the sauce over medium heat until bubbling. Add the chicken pieces and toss to coat. Garnish with sliced green onions.

Tuesday, April 5, 2011

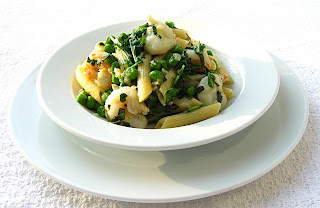
Pea & Shrimp Penne with Basil


I receive daily emails from Fine Cooking magazine's website highlighting a particular recipe, ingredient, technique, etc.  Sunday's recipe, Pea & Shrimp Penne with Basil, definitely appealed to me.  Shrimp, pasta, and basil are a few of my very favorite ingredients, so I was very intrigued.  The subject of the email was "Make It Tonight", and so I complied! The wonderful scent of fresh basil (and lots of it!), along with the minced garlic, serrano pepper, and shallots, was intoxicating.  The finished dish was so flavorful and fresh-tasting.  I will definitely be making this dish again.  Hats off to Fine Cooking!

Pea & Shrimp Penne with Basil
Serves 4

1-1/2 lb. shrimp (21 to 25 per lb.), peeled, deveined, and cut in half lengthwise
1/2 cup chopped fresh basil
5 Tbs. extra-virgin olive oil
1 Tbs. finely grated lemon zest
Kosher salt
1-1/2 cups fresh shelled peas (about 1-1/2 lb. unshelled) or frozen peas
3/4 lb. dried penne
Freshly ground black pepper
1/3 cup finely diced shallots
1 tsp. minced garlic
3/4 tsp. seeded and minced hot fresh chile, such as Thai bird or serrano
2 oz. arugula, trimmed, washed, and dried (about 2 lightly packed cups)

Toss the shrimp with half of the basil, 2 Tbs. of the olive oil, and the lemon zest. Cover and refrigerate for about 30 minutes.

Bring a large pot of well-salted water to a boil over high heat. Put the peas in a large metal sieve and dip them into the boiling water. Cook until just tender, 2 to 4 minutes. Lift the sieve from the water, let the peas drain, and then spread them on a baking sheet in a single layer to cool.

Add the pasta to the boiling water and cook, following the package directions, until al dente. Reserve 1/2 cup of the cooking water and drain the pasta.

Meanwhile, take the shrimp out of the fridge and season them lightly with salt and pepper. Heat the remaining 3 Tbs. oil in a 12-inch skillet over medium heat. Add the shallots, garlic, chile, and a pinch of salt and cook, stirring occasionally, until the shallots are soft and lightly browned, about 2 minutes. Add the shrimp and continue to cook, stirring, until the shrimp have turned pink and are almost cooked through, 2 to 3 minutes. Stir in the peas and remove from the heat.

Return the drained pasta to its pot and add the shrimp mixture and 2 Tbs. of the pasta water. Cook over medium heat until the shrimp are completely cooked through, about 1 minute more. Toss the arugula and the remaining basil into the pasta. Add more pasta water as necessary to keep the pasta moist and continue tossing until the arugula is wilted, about 1 minute. Season to taste with salt and pepper and serve immediately.

Saturday, April 2, 2011

Sweet Potato Oven Fries with Avocado Dip


I've noticed that a lot of hamburger/sandwich restaurants are offering sweet potato fries as an option to the traditional French fried potatoes  This trend has my vote - I love sweet potato fries.  In my humble opinion, they are much more flavorful, look much nicer on the plate, and provide a bit more nutritional value than their paler cousins. I occasionally roast sweet potato wedges and make a little dipping sauce to go with.  But when I saw these sweet potato fries with an avocado dip, I suspected I was on the verge of nirvana.

And I was right.

I discovered this tasty recipe from Katie of the blog, Yum Sugar.  It's such an easy recipe and so delicious.  The avocado dip blitzed up quickly in the mini-food processor.  The sweet potatoes crisped up in about a half-hour in a hot oven.  Doesn't get any easier than that!  Thanks, Katie!

Sweet Potato Oven Fries With Avocado Dip
From Ingrid Hoffmann

2 large sweet potatoes, peeled or unpeeled, cut into 4-inch long and 1/4 to 1/2-inch thick fries
2 tablespoons olive oil, or more as needed
1 teaspoon paprika
1/2 teaspoon chili powder
1/2 teaspoon ground coriander
Coarse ground rock salt and freshly ground black pepper, to taste
Avocado Dip ( recipe follows)

Preheat your oven to 450 degrees F. Line a baking sheet with aluminum foil and set aside.

 
Place the sweet potatoes in a large bowl and toss with olive oil until the sweet potatoes are coated. Add the paprika, chili powder, coriander, salt, and pepper; toss to distribute evenly.

Arrange the coated fries in a single layer on the prepared pan. Bake for 20 minutes on the lower rack until the sweet potatoes soften. Transfer the pan to the upper rack of the oven and bake 10 minutes longer, until fries are crispy. Serve with Avocado Dip.

Serves 6.

Avocado Dip:
1 avocado
1/3 cup mayonnaise
1/3 cup cream cheese
1 jalapeno, seeded and chopped
2 scallions, white and light green part only, chopped
1 lime, juiced
Salt and freshly ground black pepper

Place the avocado, mayonnaise, cream cheese, jalapeno, scallions, and lime juice into a blender or small food processor.

Blend for 1 minute or until you have a smooth paste. Season with salt and pepper, to taste. Serve as a dip for the Sweet Potato Oven Fries.

Source:  http://www.yumsugar.com/Sweet-Potato-Oven-Fries-Avocado-Dip-Recipe-11477639?page=0,0

Saturday, March 26, 2011

Shrimp & Snap Pea Salad with Ginger-Soy Vinaigrette


There is so much to like in this salad.  Quickly cooked tender shrimp, blanched-and-still-crunchy snap peas, juicy cubes of mango, and the Asian flavored dressing with soy, ginger, lime, and a slight pop of heat.  It's seriously good but oh so simple.  It makes for the consummate meal as the weather starts warming up.  The perfect bite contains mango, shrimp, a snap pea, a few bits of chopped roasted cashew, all dressed with that beautiful vinaigrette.  The mere memory of it makes me smile!

Shrimp & Snap Pea Salad with Ginger-Soy Vinaigrette

Serves 4 as a main course

1-1/2 pounds large shrimp (about 32-36 per pound)
2 cups snap peas (about 1/2 pound, trimmed)
3 green onions, trimmed and minced

Ginger-Soy Vinaigrette
1/2 cup extra virgin olive oil
2 tablespoons low-sodium soy sauce
2 tablespoons white vinegar
2 tablespoons fresh lime juice
1 tablespoon grated fresh ginger
1/2 teaspoon honey (my "tweak")
3 - 5 dashes hot sauce

Garnishes
1/2 cup diced mango
1/2 cup chopped roasted cashews
lime wedges

Bring a large pot of salted water to a boil. Add shrimp and cook 3 - 4 minutes, until they turn pink. Drain, run under cold water, peel and devein.

Meanwhile, bring another pot of salted water to a boil, drop in snap peas and boil, uncovered, 2 - 3 minutes, until just tender and still bright green. Drain and rinse immediately with cold water to stop the cooking.

To make vinaigrette: Whisk together olive oil, soy sauce, vinegar, lime juice, ginger, honey, and hot sauce in a small bowl until well-combined.

Put shrimp, snap peas, and green onions in a large bowl, add vinaigrette, and toss well. Divide the mixture among 4 plates and garnish each serving with the diced mango, chopped nuts, and lime wedges.


Source: The Beach House Cookbook, copyright 2005

Sunday, March 20, 2011

Grilled Tuna with Pineapple Relish

I'm making a concerted effort to try and eat healthier. Fish always seems to fit into the category of 'healthy living', so fish it is!  Tuna, to be exact.

One of my favorite cookbooks containing wonderful seafood recipes is The Beach House Cookbook.  This book has a plethora of lighter-fare recipes full of great flavor, and the Grilled Tuna with Pineapple Relish did not disappoint.  The bulk of the recipe concentrates on the relish:  a little chopping, a little grating, a little squeezing, and it's made.  Though the recipe doesn't call for it, I also added a teaspoon of finely minced jalapeno, which added just a hint of heat. With all that lovely flavor, the fresh tuna only needs a dribble of olive oil and some s&p before going onto the grill (or, as I did this time, into the grill pan).  So quick and easy (my recipe adjectives of choice these days) without skimping on flavor at all. 

I feel healthier already!

Grilled Tuna with Pineapple Relish
Serves 6

Pineapple Relish:
1 cup chopped fresh pineapple (I used Golden pineapples - beautiful rich yellow color and incomparable flavor)
1/2 medium red bell pepper, seeded & diced
2 green onions, minced
1-inch piece fresh ginger, grated
1 tablespoon fresh lime juice
1 tablespoon low-sodium soy sauce
1 teaspoon finely minced jalapeno
1 teaspoon toasted sesame oil
1 teaspoon sugar (unnecessary if using Golden pineapples as they are quite sweet on their own)

6 tuna steaks (about 8 ounces each and about 1-1/2 inches thick)
olive oil
salt & freshly ground black pepper

Pineapple Relish:  Combine pineapple, bell pepper, green onion, ginger, lime, soy sauce, jalapeno, sesame oil, and sugar (if using) in a medium bowl and mix well.  Taste and adjust seasonings, if necessary.

Prepare gas or charcoal grill (or heat grill pan on stove).  Brush tuna lightly with olive oil and sprinkle both sides with salt & pepper.  When the grill (or pan) is medium-hot, grill fish until it is barely opaque, about 4 to 5 minutes on each side.

Spoon generous portion of the relish over (or beside) the fish and serve at once.


Source:  The Beach House Cookbook, copyright 2005

Saturday, March 19, 2011

Appetizer: Scallops with Chili & Honey


Cooking has taken a bit of a sabbatical in my home, but the kitchen is open again!  And what better way to get cooking again than with a simple but delicious recipe.  I stumbled upon this recipe at Sweet Paul's: Scallops with chili & honey on a golden wonton.  So pretty and the perfect bite.  A bit sweet with a little bite of the finely minced chili, the tender scallop contrasts beautifully with the crisp wonton.  Instead of (what looked to me like) an over-sized square wonton wrapper, I used a fluted biscuit cutter to create pretty little rounds on which to place the golden scallops.

The recipe suggested adding the scallops and the honey at the same time.  I tweaked that a bit by browning the scallops first (make sure to pat them dry before adding to the pan), then added the honey, brought the "sauce" to barely a simmer, and finished cooking the scallops through.  Finely sliced green onions formed a little bed on the wontons on which to place the scallops and added yet another texture contrast. The whole recipe took just minutes to make, and, truth be told, just minutes to eat... I couldn't help myself!

A fine way to get cooking again, don't you think?!


Scallops with Chili, Honey on Crispy Wonton
Serves 4 as an appetizer

4 small wonton sheets
2 tablespoons canola oil
1 tablespoon olive oil
1 teaspoon red chili, finely chopped
4 large scallops, cleaned
2 tablespoons honey
salt
1/2 spring onion, thinly sliced

Heat the canola oil in a pan and fry the wonton sheets until puffy and golden.  Drain & cool on paper towel.

Heat the olive oil in a pan, add chili and sauté for 30 sec.  Add the scallops and cook for 40 sec on each side until golden.  Stir in the honey and bring to a simmer.  Add a little salt.

Arrange wonton and spring onions on small plates, and top with the cooked scallops.  Drizzle a tiny bit of the honey and chili mixture over, and serve while hot.


 Source:  Sweet Paul blog
Blog Widget by LinkWithin