One woman's foray into cooking for herself, for her family, and for her friends. It's not always picture-perfect, sometimes a little messy,
but it's always delicious. Join me in exploring new recipes, savoring the "résultats" and learning from the "erreurs".


Wednesday, February 22, 2012

Oaxaca Pizza


My Aunt Joanie is a good cook...no... a GREAT cook! She never steers me wrong when it comes to recipes. And she didn't this time, either. She told me about this simple pizza she makes every Friday night. And while it may be simple to make, it's far from simple in flavor.

Does one need another pizza recipe?? Is there anything original anymore when it comes to pizza? I think so!! At least this was new to me. First, she puts a pint of grape tomatoes in a baking pan, drizzles them with olive oil and adds salt & pepper, puts them in a hot oven (450F - 500F) for 15 - 20 minutes, then sets them aside to cool.


To save herself time (and trouble), my aunt purchases ready-made pizza dough from Central Market (pizza parlors have been known to sell dough very inexpensively, as well). And seriously, I would have purchased pre-made dough as well, but I was house-bound (a self-imposed sentence), so I blitzed up a batch of dough (see recipe below) in my KitchenAid  mixer in less than 10 minutes. I divided the dough into thirds.

Once the dough has risen, place the dough on a piece of parchment and spread out. Drizzle a bit of olive oil over the dough. Transfer the dough onto a pizza stone in a 500F. oven (a pizza peel makes short work of this), and bake for about 8 - 10 minutes.


Now here's the big difference between this pizza and any I've ever had before: oaxaco cheese (say wha-ha-ka).  This Mexican cheese grates similarly to mozzarella but is a bit saltier, more flavorful, which makes this pizza tastier! Spread the grated oaxaca cheese over the baked crust and dot the pizza with the roasted grape tomatoes. Sprinkle grated Parmigiana-Reggiano over the entire pizza and place back into the oven. Bake for about 5 - 8 minutes or until the cheese is bubbly.

Before serving, strew basil cut into a chiffonade over the pizza. It's beautiful and delicious! (I'm sure you noticed the lack of gorgeous greenery over my pizza... )

Really, those roasted grape tomatoes and that wonderful oaxaca cheese... now that's a pizza! Thanks, Aunt Joanie!!

Pizza Crust

4 cups flour
1 tablespoon vital wheat gluten (this really makes a difference in the texture of the dough)
2-1/4 teaspoons dried instant yeast
1-1/2 cup tepid water
3 tablespoons olive oil
1-1/2 teaspoons salt

Mix flour, vital wheat gluten, instant yeast, water and olive oil. If dough does not come together and form a ball, add a bit more water. Let dough rest 10 minutes. Add salt, mix well, and knead for 5 minutes. Place dough in oiled bowl, cover with plastic wrap, and place in draft-free area to rise until double, about 45 minutes to 1 hour.


P.S. I would have posted a few days earlier, but I was electronically stymied. The cord connecting my camera and computer was frayed almost in two! However, we are back in business! Thanks to all for your patience!!

Thursday, February 9, 2012

Where have you been, young lady?!

Good question. Wish I had a good answer...

I did have some medical issues that affected my eating. Which affected my desire to cook. Hence, no posts for over 6 months. BUT things are looking up. And I'm resolved to get cooking again!

I have done a little cooking. I actually baked a potato just the other day! (Let's hear a little woo-hoo from the peanut gallery!) And I've been making a quinoa-and-kale dish that's really good (seriously, it's REALLY good! No, I haven't turned 'treehugger', but I am trying to eat a little healthier...)

So, keep your fingers crossed. If all goes well, I may actually have a recipe post this weekend!!

Thanks to all who have emailed to check on me. Your kind gestures really meant a lot to me!


Lori

Saturday, June 11, 2011

Rigatoni with Broccoli, Garlic & Breadcrumbs

Whenever I visit New York City with my friends and family, we often visit our favorite Italian restaurant there - Carmine's.  The mid-town Manhattan location is always busy, especially with the many Broadway patrons before and after shows.  I've even had the opportunity to bump into some of Broadway's biggest stars (I once saw Patty Lupone!) 

The food is always wonderful and plentiful, just like most Italian homes, whether it's one of their wonderful salads, hot or cold appetizers, delicious meat dishes, or, of course, the many pasta dishes they offer.  One of my daughter's favorites is their Rigatoni with Broccoli, Garlic & Olive Oil which comes sprinkled with toasted breadcrumbs and grated Parmegiana-Reggiano.  It's a delicious non-meat entree that will satisfy even the dedicated carnivores at your dinner table. 


Rigatoni with Broccoli, Garlic & Breadcrumbs
Serves 4

3/4 to 1 pound broccoli florets
1 pound rigatoni
5 tablespoons olive oil
1⁄3 cup dried breadcrumbs
4 - 6 cloves thinly sliced garlic
1⁄4 teaspoon red pepper flakes
1⁄2 cup grated Parmigiana-Reggiano

Bring a large pot of salted water to a boil.Add the broccoli and cook until just tender, about 5 minutes. Remove with a slotted spoon and drain. Set aside.
 
Bring the water back to a boil and add the pasta.While the pasta cooks, heat 2 tablespoons of the olive oil in a large, deep skillet over low heat. Add the bread crumbs, stirring, until the crumbs are toasted a golden brown. Remove the breadcrumbs to a small bowl and set aside.
 
Return the skillet to the heat and add the remaining olive oil, garlic, and pepper flakes.Cook until fragrant, then stir in the broccoli. Stir to coat with the oil as the broccoli reheats, and taste for seasoning.  If pasta is not yet done, keep the heat low to avoid burning the broccoli.
 
Drain the cooked pasta and add it to the broccoli mixture.Cook over high heat for a minute or so to evaporate any water from the pasta, then stir in the bread crumbs and cheese and serve immediately.


Friday, June 10, 2011

"Duffins"

My friend, Marysol, at Memories in the Baking, originally shared the recipe for these little tastes of heaven on an internet cooking forum we both occasionally visit.  "Dirt Bombs" are wonderful muffins dipped in melted butter (sounds good already, right?!), then rolled in cinnamon sugar.  Covered in cinnamon sugar.  Glistening with cinnamon sugar. The coating keeps them moist and, well, irresistible.  My son said they were a cross between a doughnut and a muffin, and so re-named them "Duffins".  Fine by me!  Duffins it is!

Sol's Dirt Bombs
Yields: 12 muffins*

3 cups AP flour, minus 3 tablespoons
1 tablespoon baking powder
1/2 teaspoon salt
1/2 teaspoon ground nutmeg
1/4 teaspoon ground cardamom
3/4 cup (1-1/2 sticks) unsalted butter
1 cup granulated sugar
2 large eggs
1 cup whole milk **

Topping ***
3/4 cups unsalted butter, melted
1/2 cup granulated sugar
1-1/2 teaspoons ground cinnamon

Preheat oven to 400º F. Place the rack in the center position. Generously grease a 12-cup standard muffin pan.

Sift the flour, baking powder, salt, nutmeg and cardamom into a mixing bowl. In another bowl, cream the butter and sugar until light and fluffy. Scrape the bowl down half way through. Mix in the eggs. Add the dry ingredients alternately with the milk in two additions, mixing gently by hand to incorporate all the flour. The batter will be on the stiff side, but airy. Don’t over mix or beat the batter as this will make the muffins tough. Spoon the batter into the prepared pan, without smoothing the tops. Bake for about 25 minutes or until a cake tester inserted in the center comes out clean. As soon as the muffins are cool enough to handle, turn them out onto a wire rack.

Add the melted butter to a bowl. In another bowl, mix the sugar
and cinnamon. Dip the muffins (top, sides and bottom) in the butter, using a pastry brush -if necessary- to cover areas not buttered by dipping. Immediately roll the muffins in the cinnamon sugar mixture. Serve warm or at room temperature.

Sol's notes:
*I've made this twice, and both times, this recipe has yielded 16 muffins instead of 12.
**I substituted whole buttermilk for whole milk because I always have it on hand and prefer it for baking.
*** The amounts listed for the sugar and cinnamon are not quite enough to coat all the muffins, so I recommend you double it.

Saturday, May 21, 2011

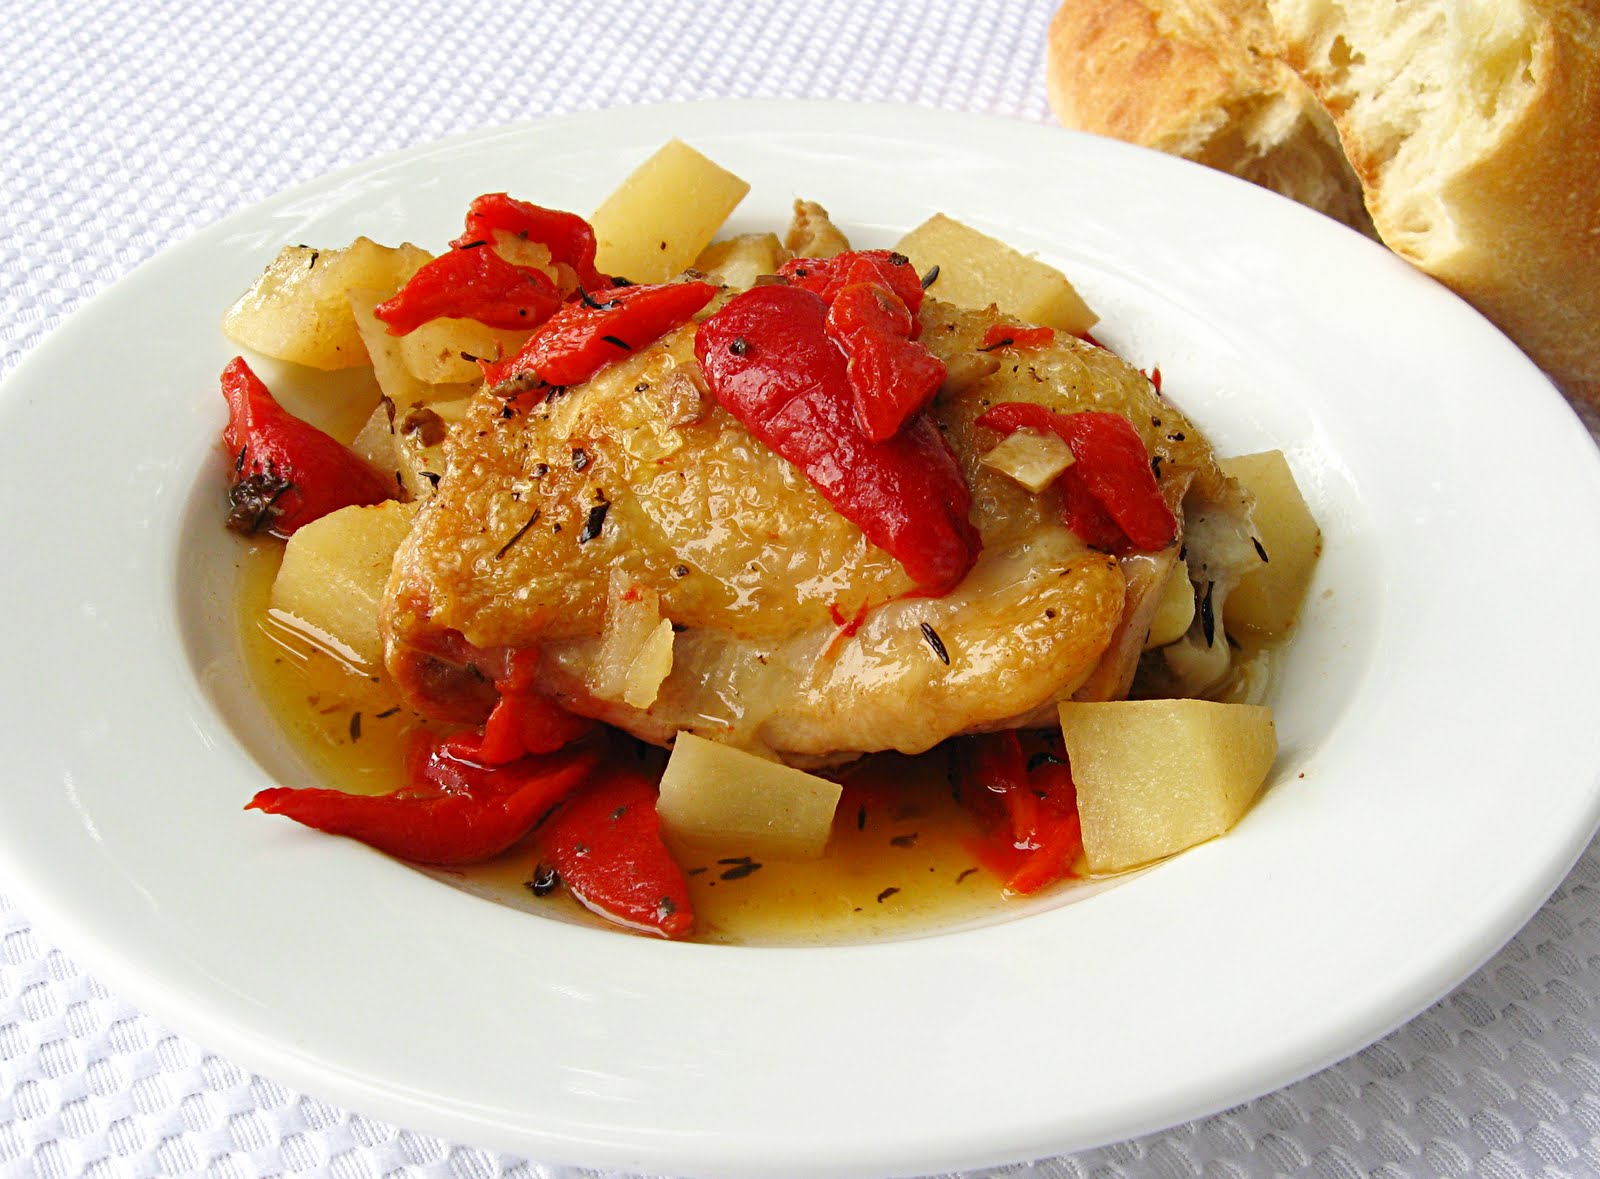
Garlicky Chicken in Red Pepper Sauce

This is another recipe I received in an email from Fine Cooking in their "Make It Tonight" series. It looked really easy, sounded really delicious.  And it was.  Both easy and delicious.  The chicken was so tender and juicy.  The sauce was so flavorful.  And it all came together so quickly.  I love that!  I didn't have fresh thyme on hand, so I substituted about 3/4 teaspoon of dried French thyme.  One other thing - the next time I make this, I will add more potatoes (at least one more, but probably two). Make sure to have a crusty baguette on hand to sop up that amazing sauce. A little starter salad would be a nice addition to round out the meal.

Garlicky Chicken in Red Pepper Sauce
Serves 4

2 Tbs. olive oil
8 bone-in skin-on chicken thighs (about 3 lbs.), trimmed of excess fat and skin
Kosher salt and freshly ground black pepper
6 cloves garlic, smashed
2 tsp. fresh thyme leaves
1 cup lower-salt chicken broth
3 jarred roasted red peppers, drained and cut into 1-inch strips (1-1/2 cups)
1 medium russet potato, peeled and cut into 3/4-inch dice (1-1/2 cups)
1 Tbs. sherry vinegar
Crusty baguette for serving

Position a rack in the center of the oven and heat the oven to 425°F. Heat the oil in a large, oven-proof sauté pan over medium-high heat until it’s shimmering. Sprinkle the chicken with 1-1/2 tsp. salt and 1/2 tsp. pepper. Add half the thighs to the pan, skin side down. Reduce the heat to medium, and cook without touching until the skin browns and easily releases from the pan, about 3 minutes. Turn and cook for 1 minute. Transfer to a large plate. Add the remaining chicken and cook it in the same manner. Transfer the chicken to the plate. Add the garlic and thyme to the pan and cook until the garlic is lightly browned, 2 to 3 minutes. Add the chicken broth, red peppers, potato, and sherry vinegar to the pan, and bring to a boil. Remove from the heat, return the chicken to the pan skin side up, and transfer to the oven.

Braise the chicken, uncovered, until the potato pieces are tender and the chicken is completely cooked through, about 30 minutes.


Source: Fine Cooking

Thursday, May 19, 2011

Tamale Pie


The first cookbook I ever owned as a new bride was Better Homes and Gardens New Cook Book.  I made lots and lots of the recipes contained in that cookbook, many of which remain favorites to this day.  The first few sections introduced me to appliance cooking:  how to use my Crockpot (the Olive Spaghetti Sauce sounds a bit odd but is really good), the Oriental Pork helped familiarize me with my new electric skillet, the Bar-B-Q Meat Loaves (yes, individual meat loaves) made me less intimidated of my little Weber grill.  Coffee cake, Swedish Tea Ring, white bread, pancakes, penuche, Spanish tomato rice (a really tasty rice dish), puddings, pies, roasts, as well as sections on meal planning and ingredient substitutions were the basis of my culinary education.  The pages of BH&G New Cook Book all have the tell-tale splatters of a well-used cookbook in my kitchen.  Admittedly, some of the recipes are dated, but, all in all, I still turn to this cookbook on a fairly regular basis.

In a bit of nostalgia, I decided to look through the book and review some of the recipes I used to make as a novice cook.  The spiral-bound pages are a little worse for wear, but like a neglected grade-school child, one page just fell out of the book as if to say 'Pick me! Pick me!'  The stained page containing the recipe for Tamale Pie floated to the floor, the holes of the page no longer intact to remain in the book of its own accord.

So, Tamale Pie it was.

I actually have a few vivid memories involving this dish.  It was one of the meals I made for my parents when they came from New York to visit their newly married daughter at our first Texas apartment.  Trying to prove to my mother that I could indeed cook, I made this recipe.  Not exactly Beef Wellington, but it came out fine.  Mom and Dad at least feigned approval of my initial cooking abilities.

One time, after simmering the meat and vegetables for the prerequisite 25 minutes, I lifted the pan full of hot ingredients to pour into the casserole dish, and lost my grip.  Hot saucy meat and vegetables went all over the floor of my then-tiny kitchen.  Not pretty.

And I never lift a full pan without making sure I have a good grip on it anymore.  Never.

A couple of changes I made this time (after not making this recipe in easily 15 - 20 years):  I replaced 1/2 teaspoon of the chili powder called for with chipotle chili powder.  It added a wonderful smoky heat to the dish that I really love.  I used a red bell pepper instead of a green pepper (I'm not particularly fond of green peppers...)  The recipe lists a teaspoon of sugar, which I omitted, especially since the red pepper adds its own bit of sweetness.  And I used just a handful of grated Cheddar cheese instead of the 6 ounces used in the original  recipe. (Actually, the original recipe calls for 6 ounces of sharp process American cheese, but I never used processed cheese in the dish.)  The little bit of grated cheese helped bind the meat mixture and was enough for me, but use the whole 6 ounces if it appeals to you.

Retro cooking.  Ya gotta love it!

Tamale Pie
serves 6

1 pound ground chuck
1 cup chopped onion
1 cup chopped red bell pepper
2 8-ounce cans tomato sauce
1-1/2 cups corn (fresh or frozen)
1/2 cup pitted ripe olives, chopped
1 clove garlic, minced
1 teaspoon salt
2-1/2 teaspoons chili powder
1/2 teaspoon chipotle chili powder
Dash black pepper

6 ounces sharp Cheddar cheese, grated

3/4 cup yellow cornmeal
1/2 teaspoon salt
2 cups cold water
1 tablespoon butter

Cook meat, onion, and bell pepper in a large skillet until meat is lightly browned and vegetables are tender.  Stir in tomato sauce, corn, olives, garlic, 1 teaspoon salt, chili powders, and black pepper.  Simmer 20 to 25 minutes or until thick.  Stir in cheese. Turn into a greased 9x9x2-inch baking dish.

Preheat oven to 375 F.

Stir cornmeal and 1/2 teaspoon salt into cold water.  Cook, stirring constantly, until thick.  Add butter, and mix well.  Spoon cornmeal mixture over hot meat mixture.

Bake 40 minutes.


Source:  Better Homes and Gardens New Cook Book, copyright 1968

Monday, May 16, 2011

Southwestern Turkey Wrap


I'm trying to be more frugal these days by taking my lunch to work as often as I can.  Sometimes, that means leftovers if I've cooked something particularly delicious and plentiful (like the General Tso's Chicken of a couple of weeks ago).  But when I happened upon this wrap, it got my attention.  Now, one doesn't normally need a recipe for a wrap. The real recipe here is for the spread that seasons this one.  It's easy, it's delicious, and because of it, definitely takes lunch fare up a notch.  The avocado is optional, but it does add a nice richness and flavor.  Want a satisfying lunch?  Try a Southwestern Turkey Wrap!

Southwestern Turkey Wraps
Makes 4

1/2 cup mayonnaise (not Miracle Whip!)
3 tablespoons chopped cilantro
1 green onion, minced
1 tablespoon minced chipotle
1 teaspoon fresh lime juice

4 10-inch flour tortillas (I've used a sun-dried tomato wrap here)
16 ounces smoked turkey
8 ounces pepper jack cheese
thinly sliced avocado
mesclun (or spring mix salad)
12 thin tomato slices

Spread approximately 2 tablespoons of the chipotle-mayonnaise spread on tortilla. Top with turkey, pepper jack, mesclun, avocado, and tomato slices. Roll fairly tightly, cut diagonally, and serve.


Source:  Contessa's Kitchen
Blog Widget by LinkWithin